How to Make an Interior Design Estimate for a Client

Turn the design you already drew into a priced estimate that your client can sign by link. Your first estimate is free.
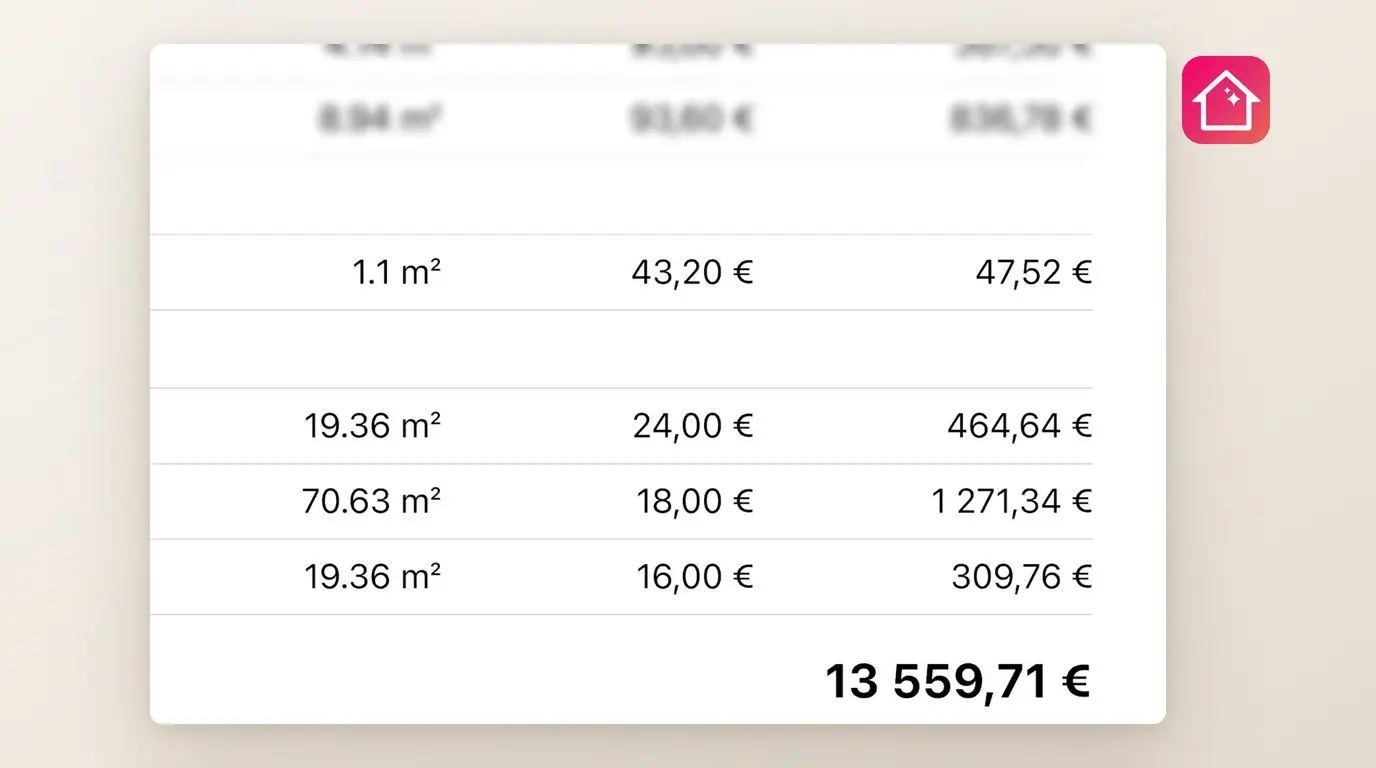
Your client has seen the 3D design and asks the next question: "So how much will it cost?" An interior design estimate answers it, but the usual way to make one can take a whole evening. You copy every item from the shopping list into a spreadsheet, measure the walls again for the painter's price, add your markup with a formula and export a PDF. Then you wait for a reply, and the client asks you to drop one lamp. You make version three.
Client estimate in Home Planner starts from the project you already drew. The items, their quantities and the room areas are already counted, so you add only your prices, your work and your markup. Your client gets a numbered PDF with your logo, or a link to open the estimate in a browser, answer and sign.
Why do designers make estimates in Home Planner?
Because the estimate is faster to build, its numbers come from the plan, and it reaches the client as a finished document.
- Less typing. Home Planner takes the items from the shopping list and the floor, wall and ceiling areas, doors and windows from the plan, so you type only prices. It also carries your prices and terms over to the next estimate.
- Numbers from the plan. Home Planner takes the quantities from the same plan your client saw in 3D, not from a second measurement. It adds the markup, tax, discount and deposit itself, so there is no spreadsheet formula to break.
- A document, not a spreadsheet. Home Planner builds a numbered PDF with your logo and contacts, a valid-until date, the deposit and the balance due. It keeps your purchase prices and your markup out of everything the client sees, and it can hide unit prices too.
More than a PDF in an inbox
With a PDF in an e-mail, you send it and wait. With the client link, Home Planner brings the estimate back to you with an answer.
- The client opens the estimate in any browser. No app and no account are needed.
- They switch your optional lines on or off and see the total update.
- They approve and sign with a drawn signature or a typed name, ask for changes, or decline.
- No answer yet? Home Planner e-mails the client a reminder on day 3 and day 7.
- After signing, Home Planner e-mails the client the signed PDF.
- After your edit, Home Planner shows the new revision on the same link and marks what changed.
Each answer appears in Home Planner as the status of the estimate. One thing Home Planner does not do: collect payments. The deposit and the balance due are printed, and the client pays you the way you agreed.
How does an interior design estimate work in Home Planner?
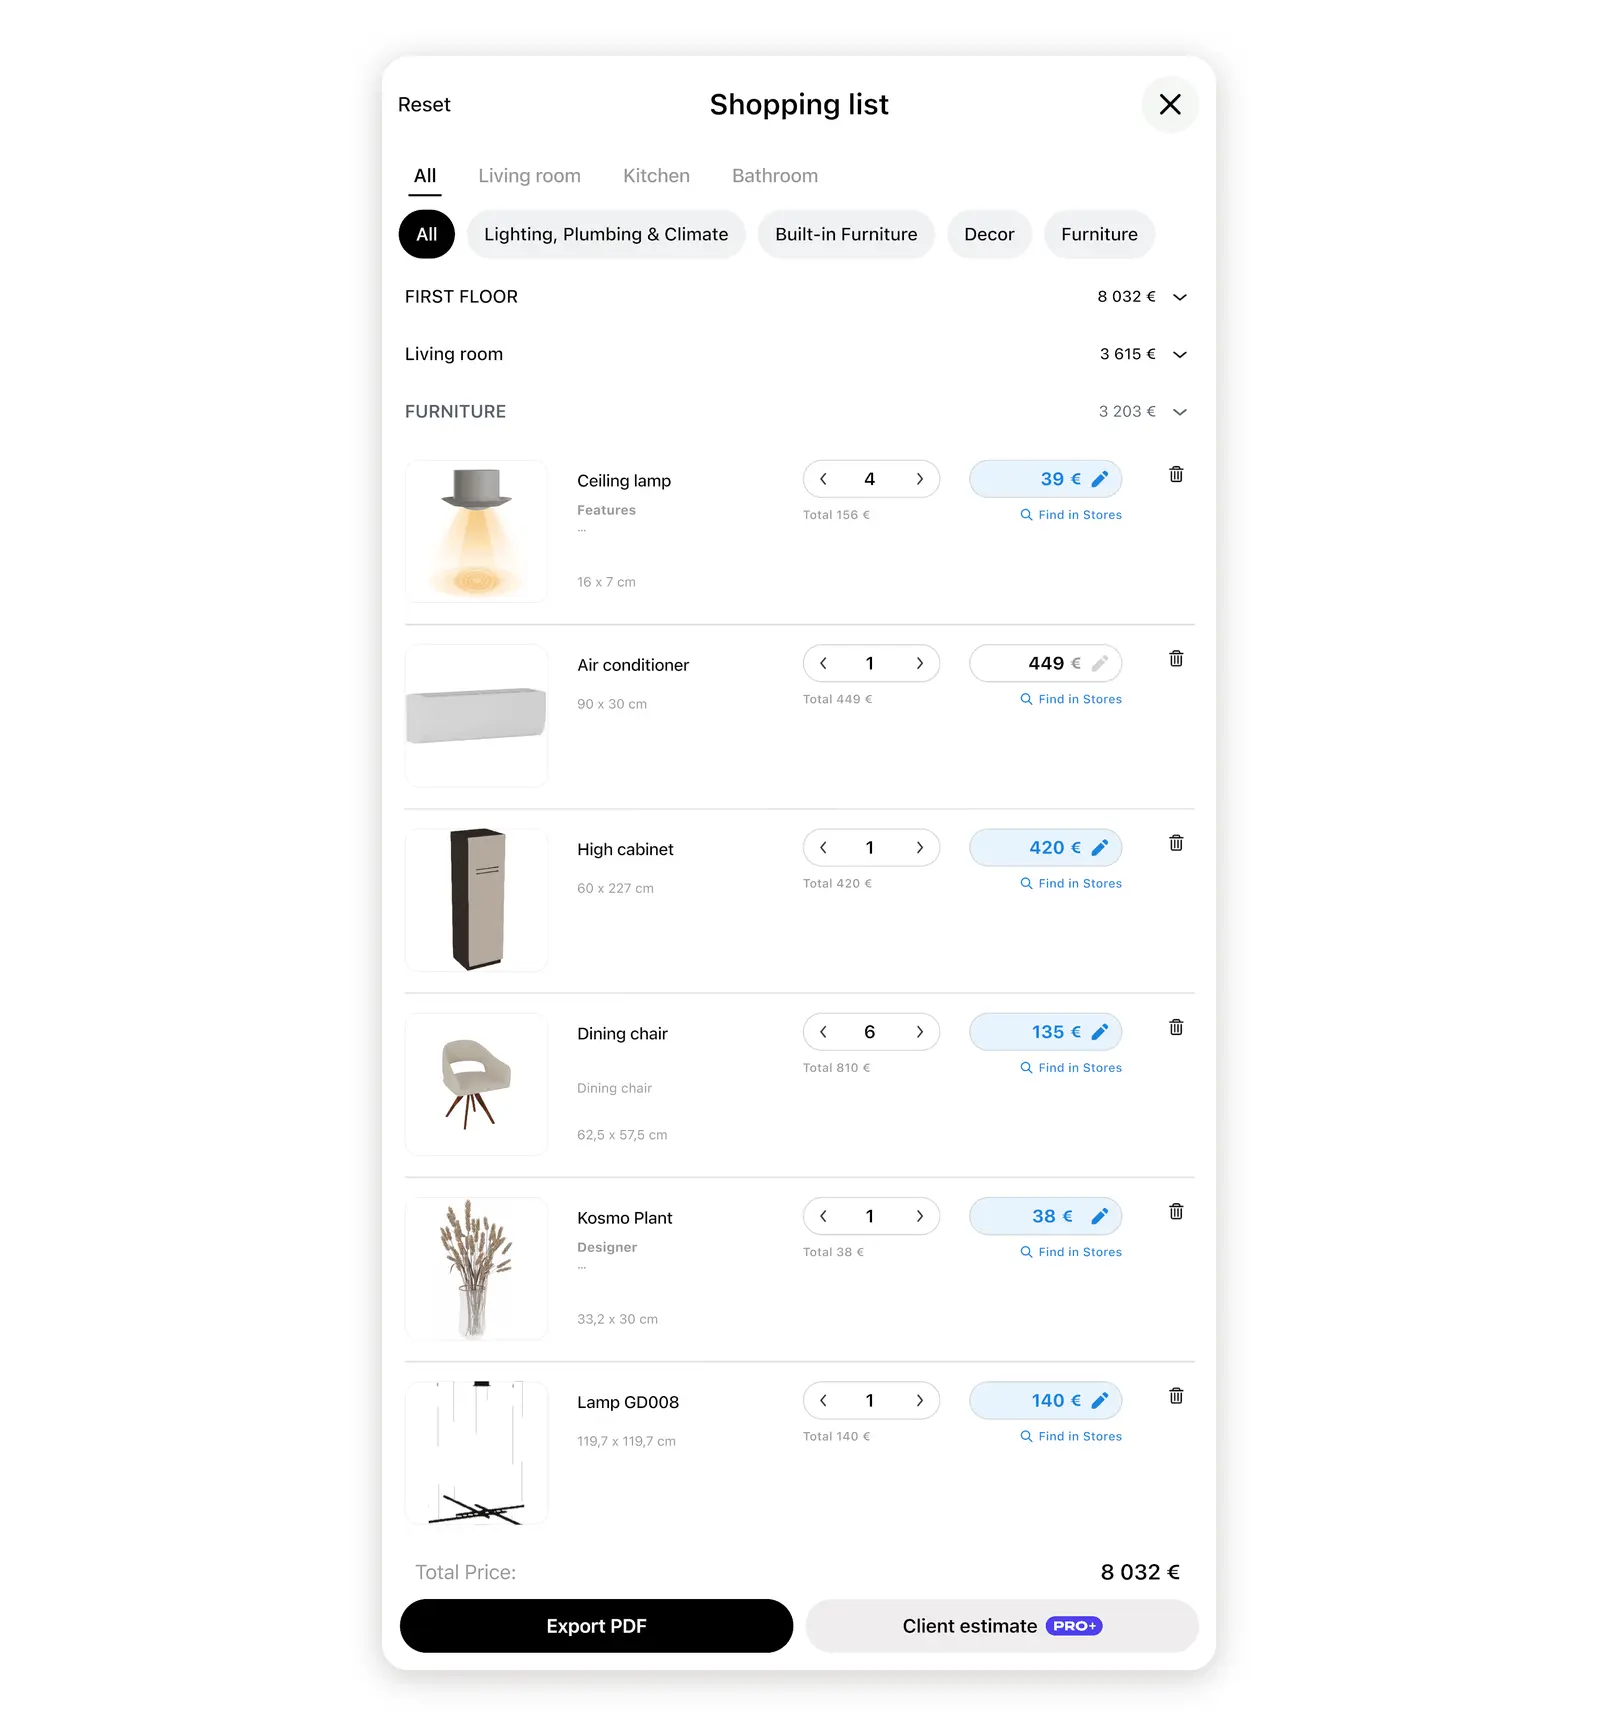
You build the estimate in one window that opens from the shopping list of your project. It takes three steps.
- Select Client estimate in the Shopping list window of your project.
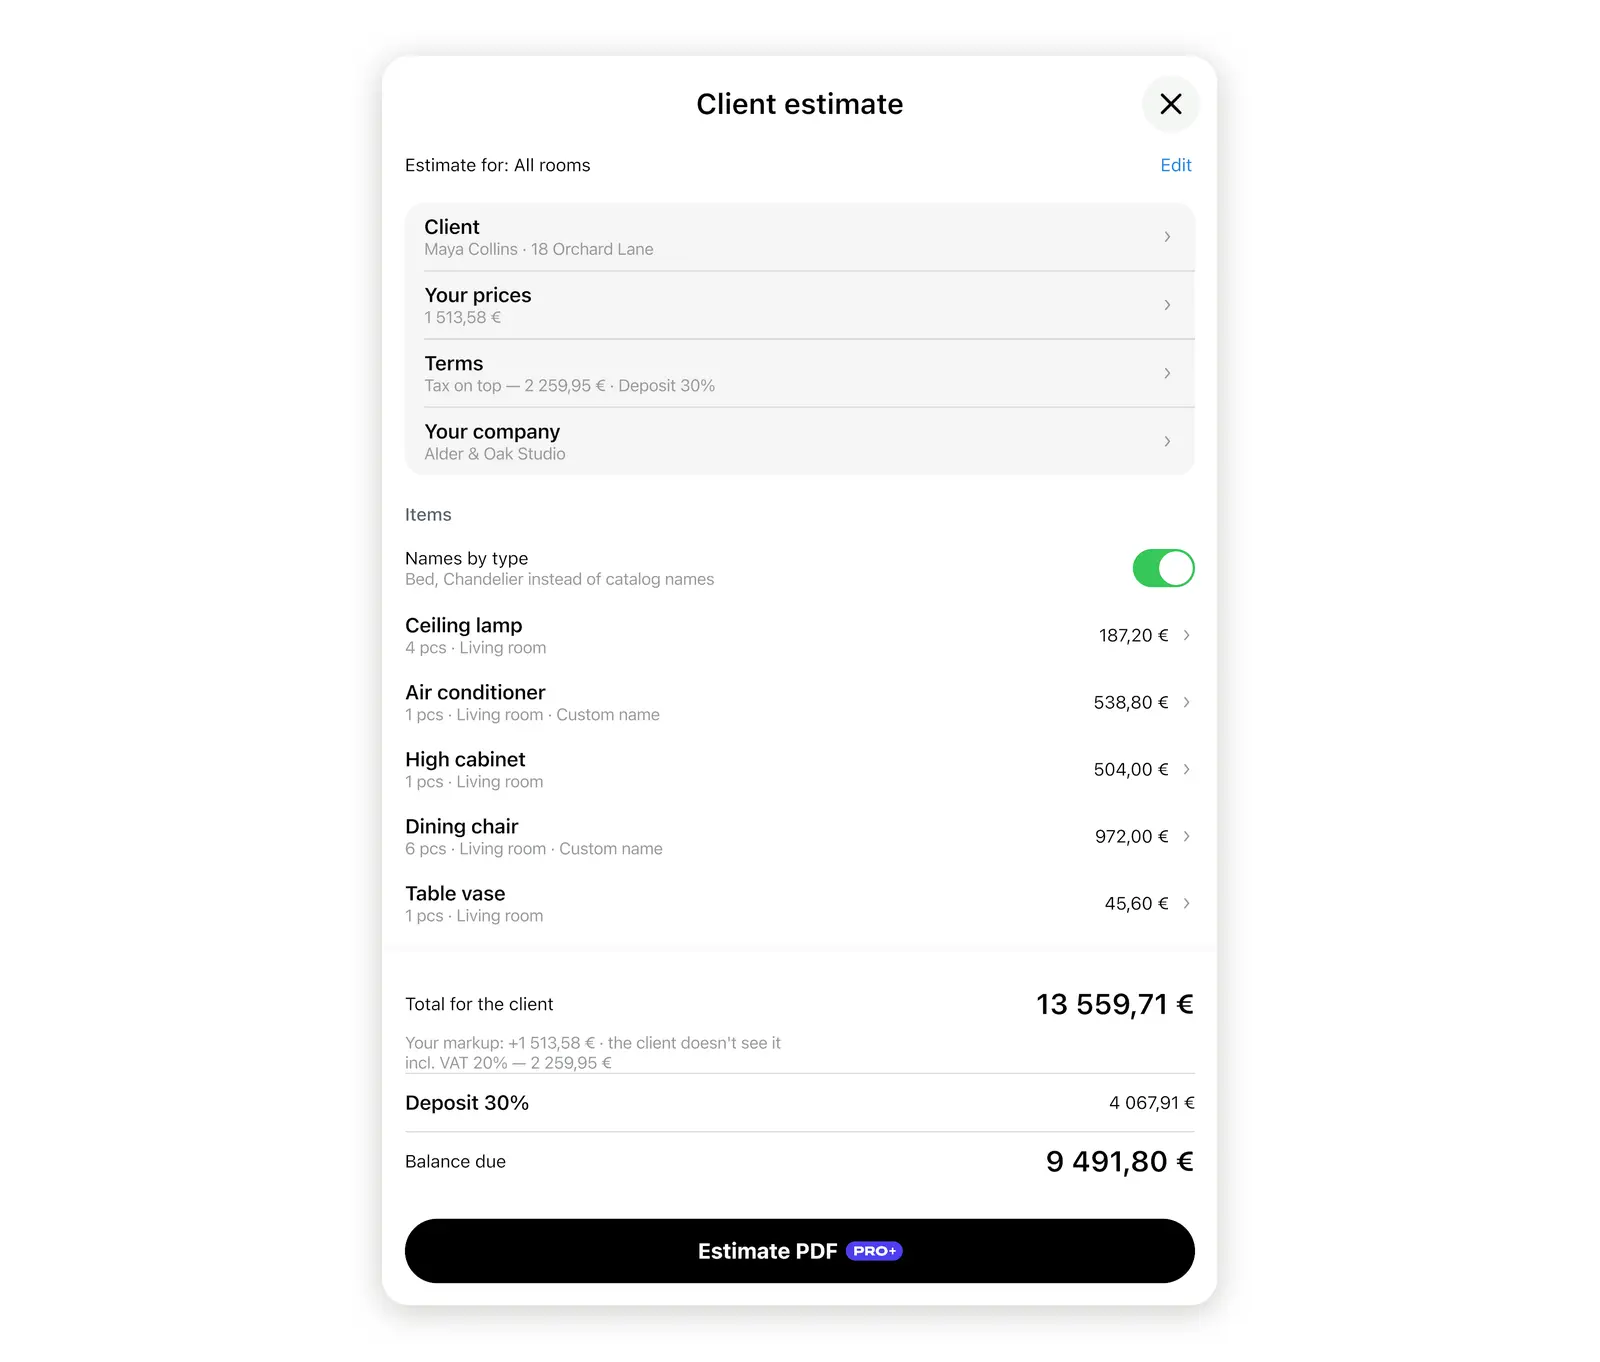
- Add your markup, your work prices and your terms. Total for the client updates after each change.
- Select Estimate PDF at the bottom of the estimate window, then send the file or a link. Your client answers, and you see the answer in Home Planner.
Before you start
| You need | Why |
|---|---|
| A project with furniture or materials in the plan | The Items list comes from the shopping list. |
| Rooms in the plan | Work quantities, such as floor area or the number of doors, come from the rooms. |
| A Home Planner account and an internet connection | The estimate number and the client link come from the Home Planner server. |
| To be the author of the project | Only the author sees the estimate. Co-editors and viewers of a shared project do not. |
| The client's e-mail, for the link | Reminders and the signed copy go to it. |
| PRO+ or PRO++, after your first estimate | Every estimate you issue after the first one needs it. |
Home Planner runs on iPhone, iPad, Android, Mac and Windows; the screenshots show the desktop app.
How do you write an estimate for a customer in Home Planner?
Open the estimate from the shopping list, then say who it is for and which rooms it covers.
- Open your project, select the share icon at the top right of the editor and choose Shopping list.
- Select Client estimate in the Shopping list window.
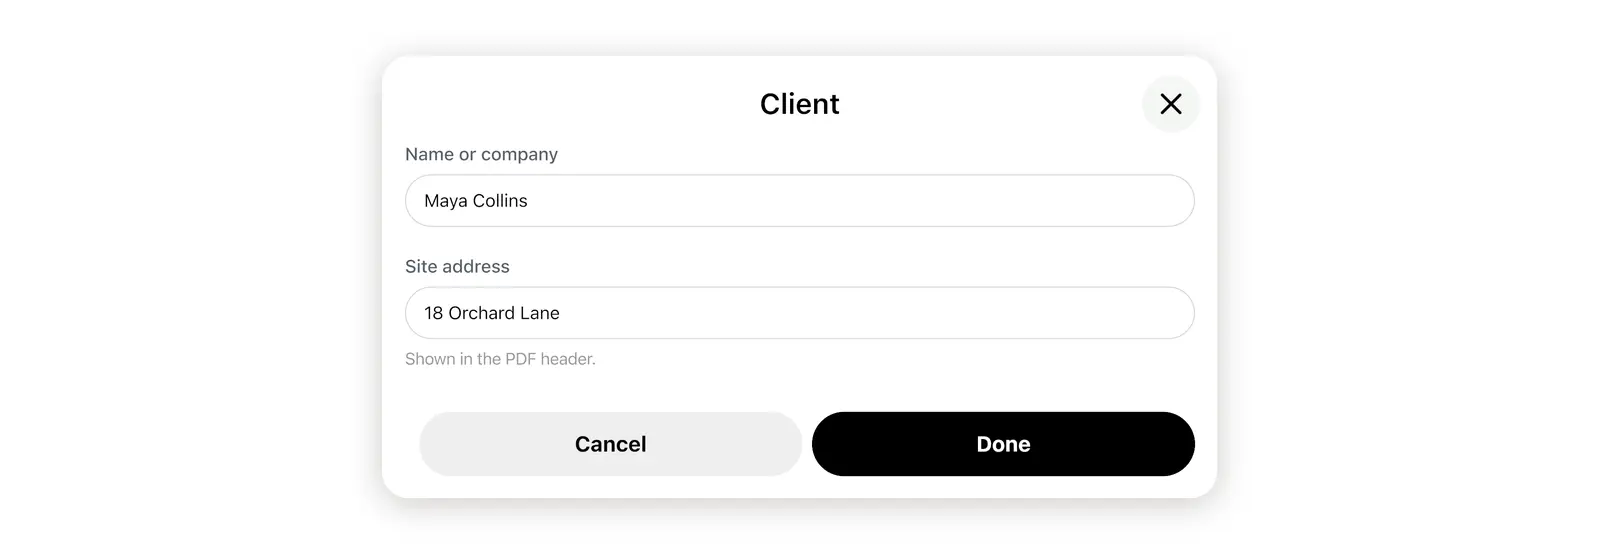
- Select the Client row at the top of the estimate window and enter Name or company and Site address. Both go into the PDF.
- With more than one room, check Estimate for: at the top of the window. Select Edit next to it to keep only the rooms this estimate covers.

Before your first estimate, Home Planner offers a sample PDF with a watermark. Open it to see what your client receives before you enter a single price.
How do you price an interior design project in Home Planner?
Add a markup to the items, a price to each type of work, then your terms. Home Planner does the arithmetic. You set the prices.
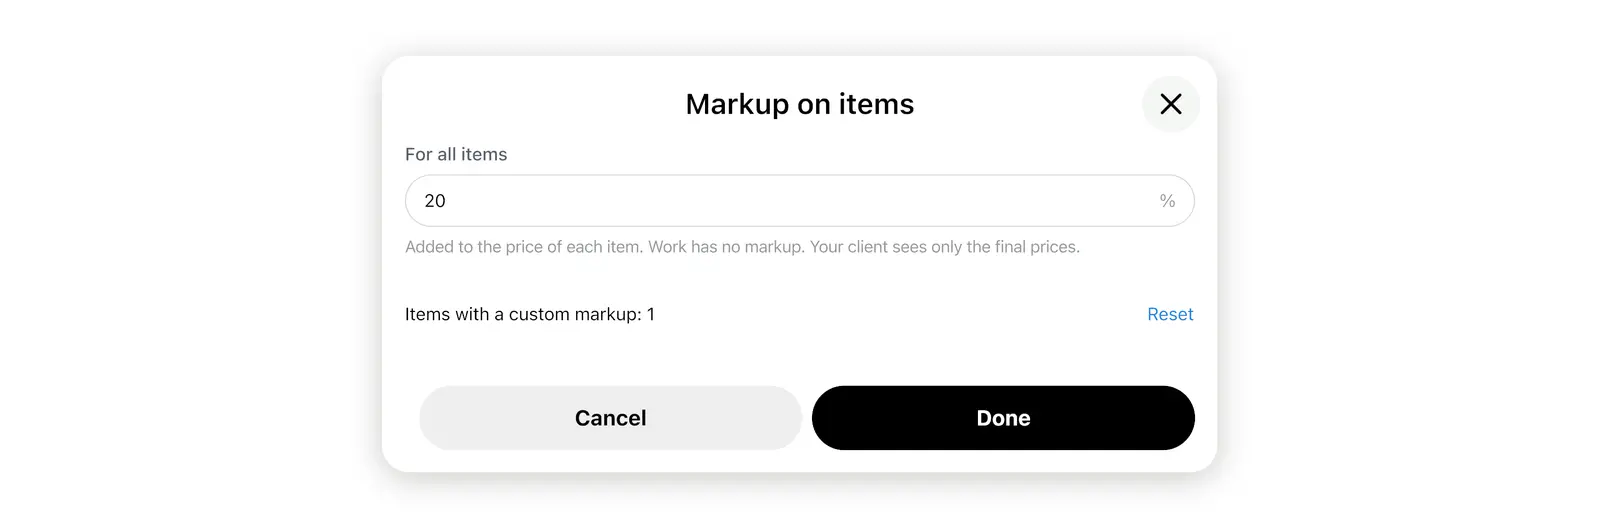
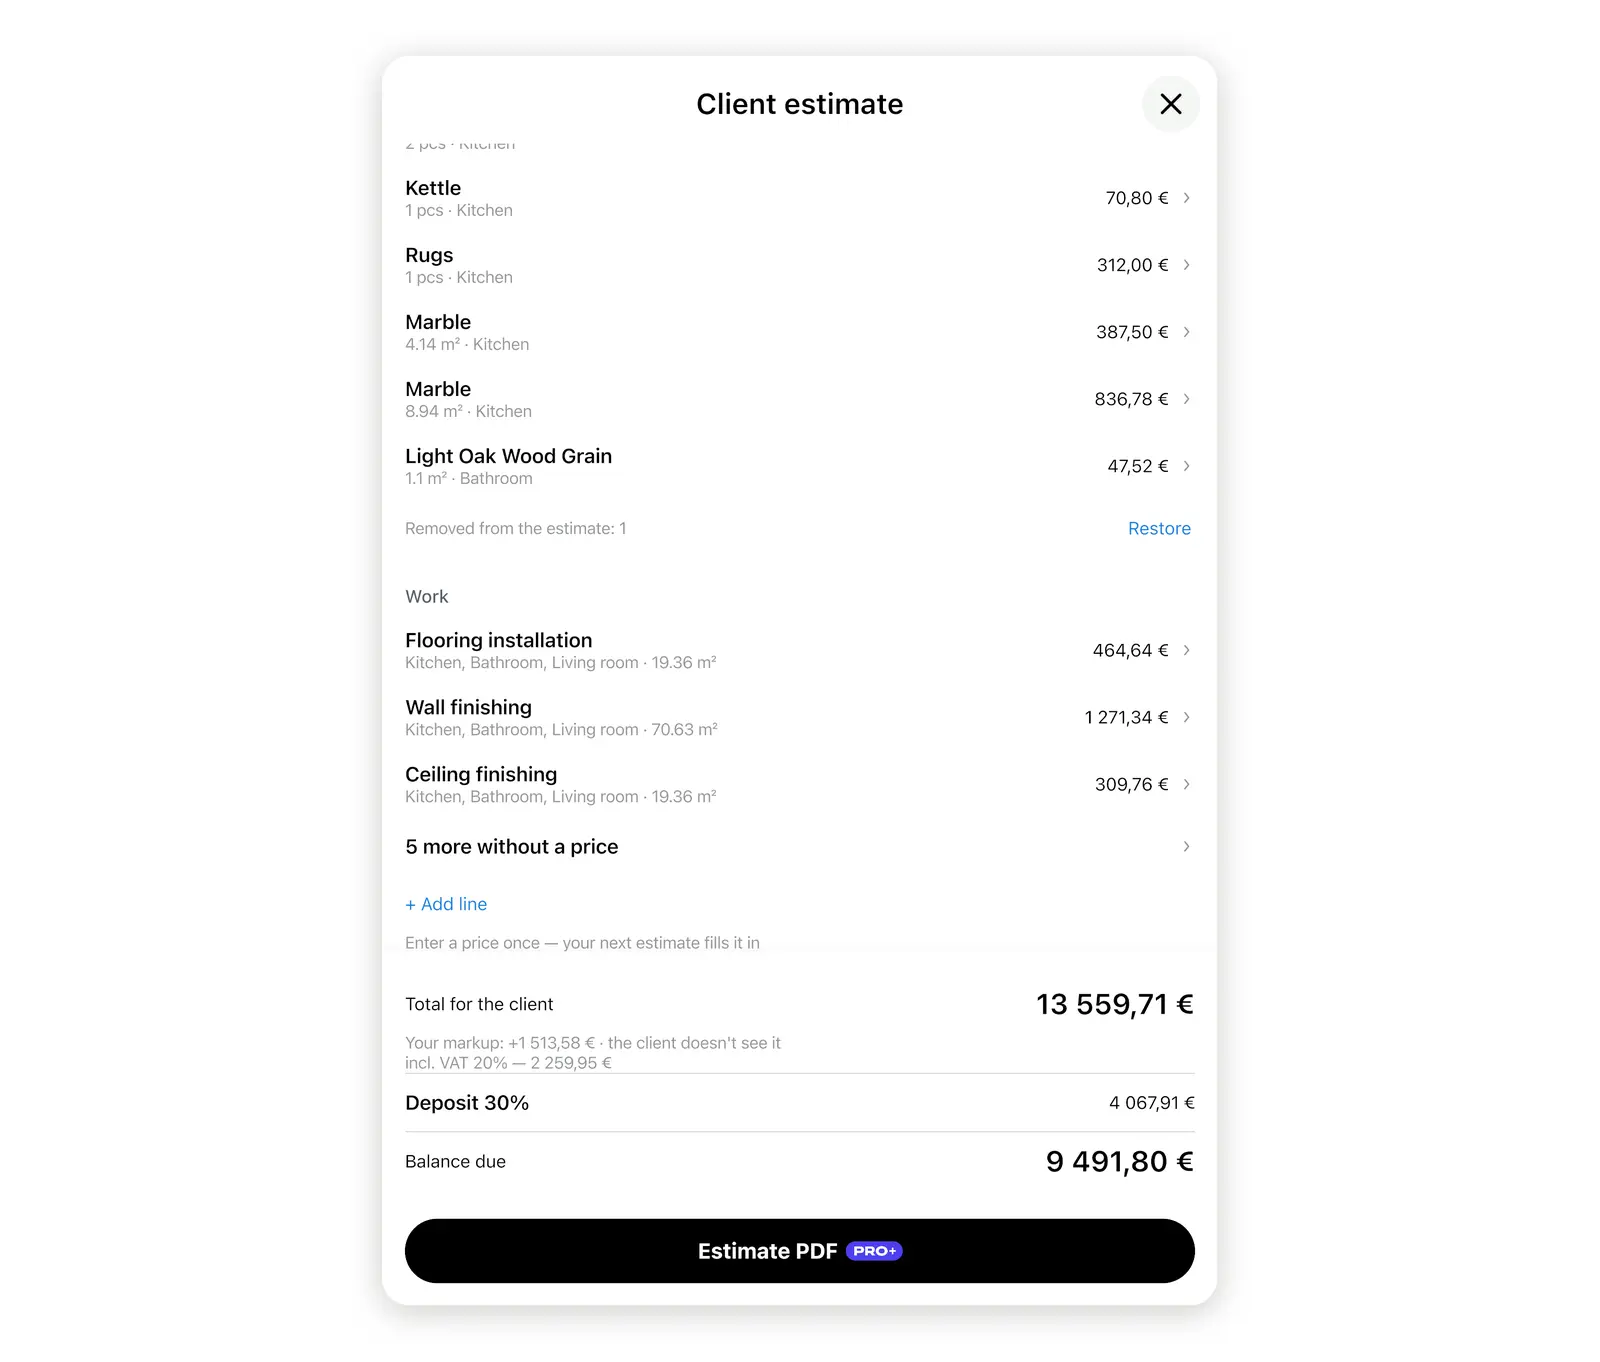
- Markup. Select the Your prices row under Client, enter the percentage under For all items and select Done. A 20% markup turns a purchase price of 1,000 into 1,200 for your client. Work has no markup.
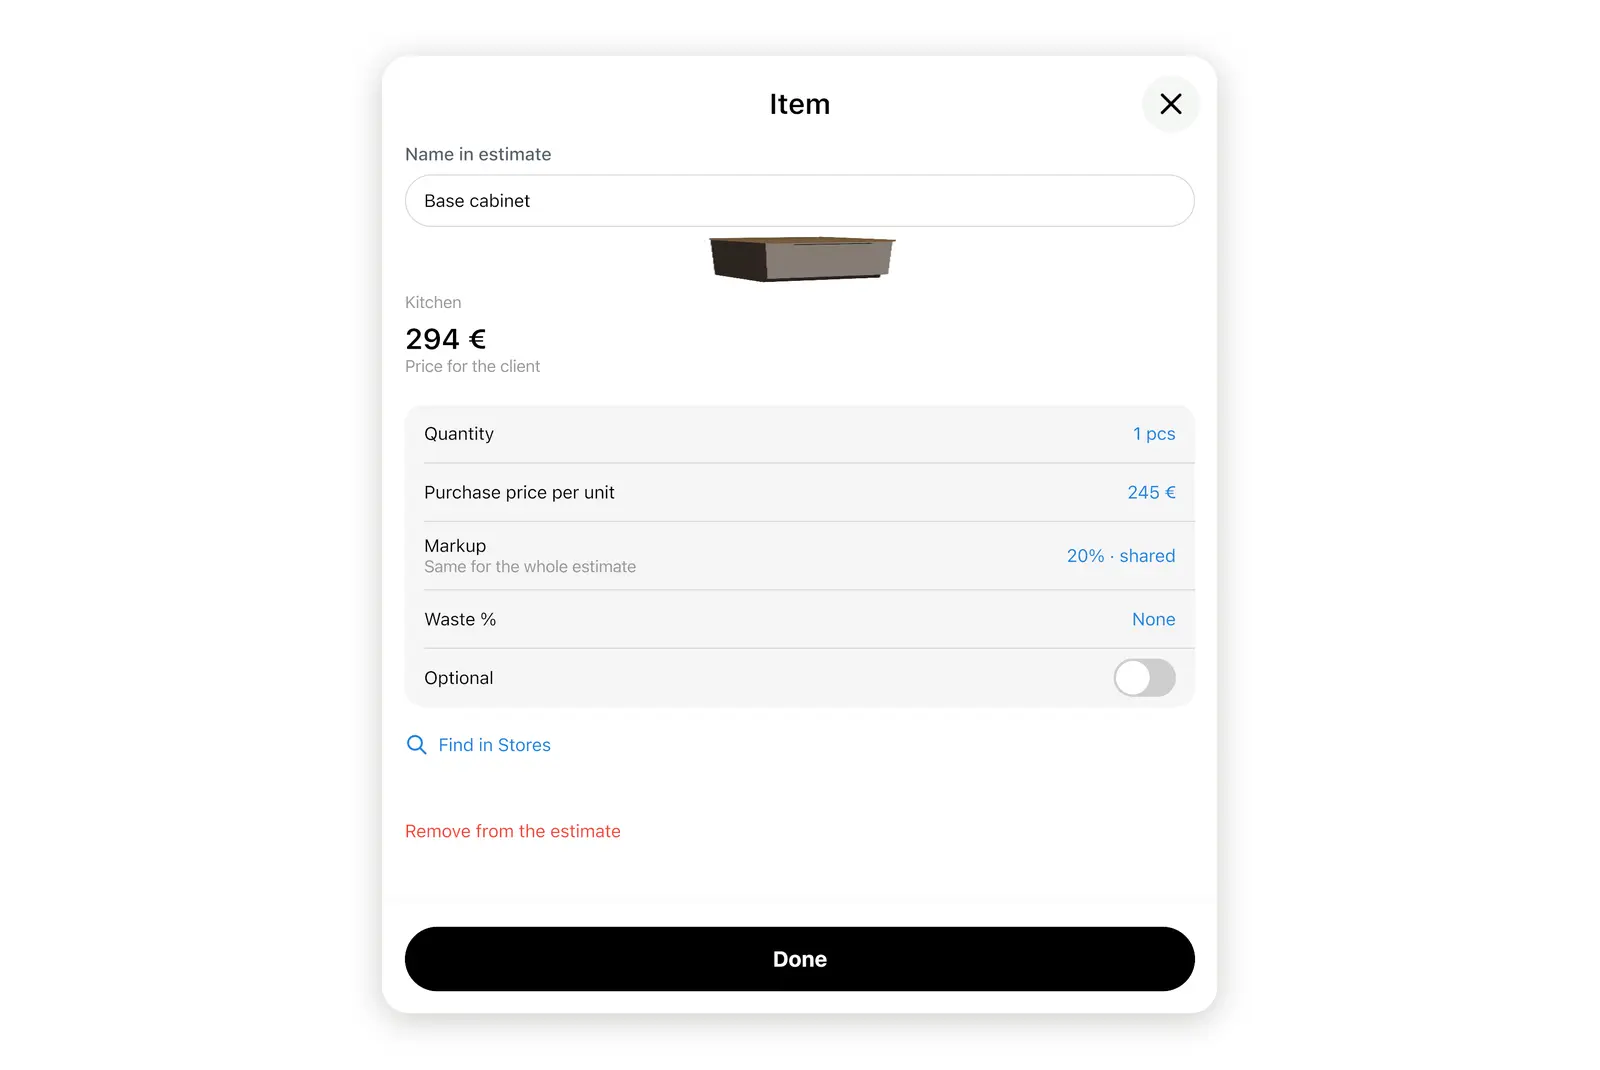
- Items. Select a row in the Items list to change its Purchase price per unit, Quantity or Markup, to add Waste % for cut materials, or to mark it Optional: the client can then add it on the estimate page. A row that shows No price stays out of the total: enter its price, or select Remove from the estimate.
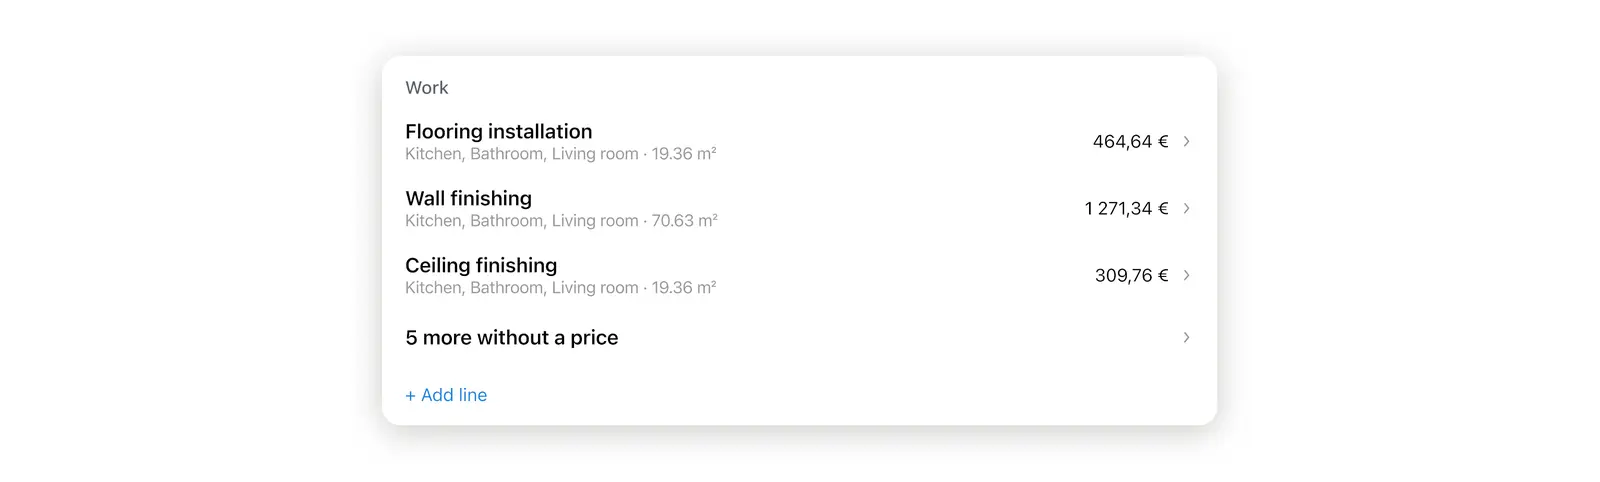
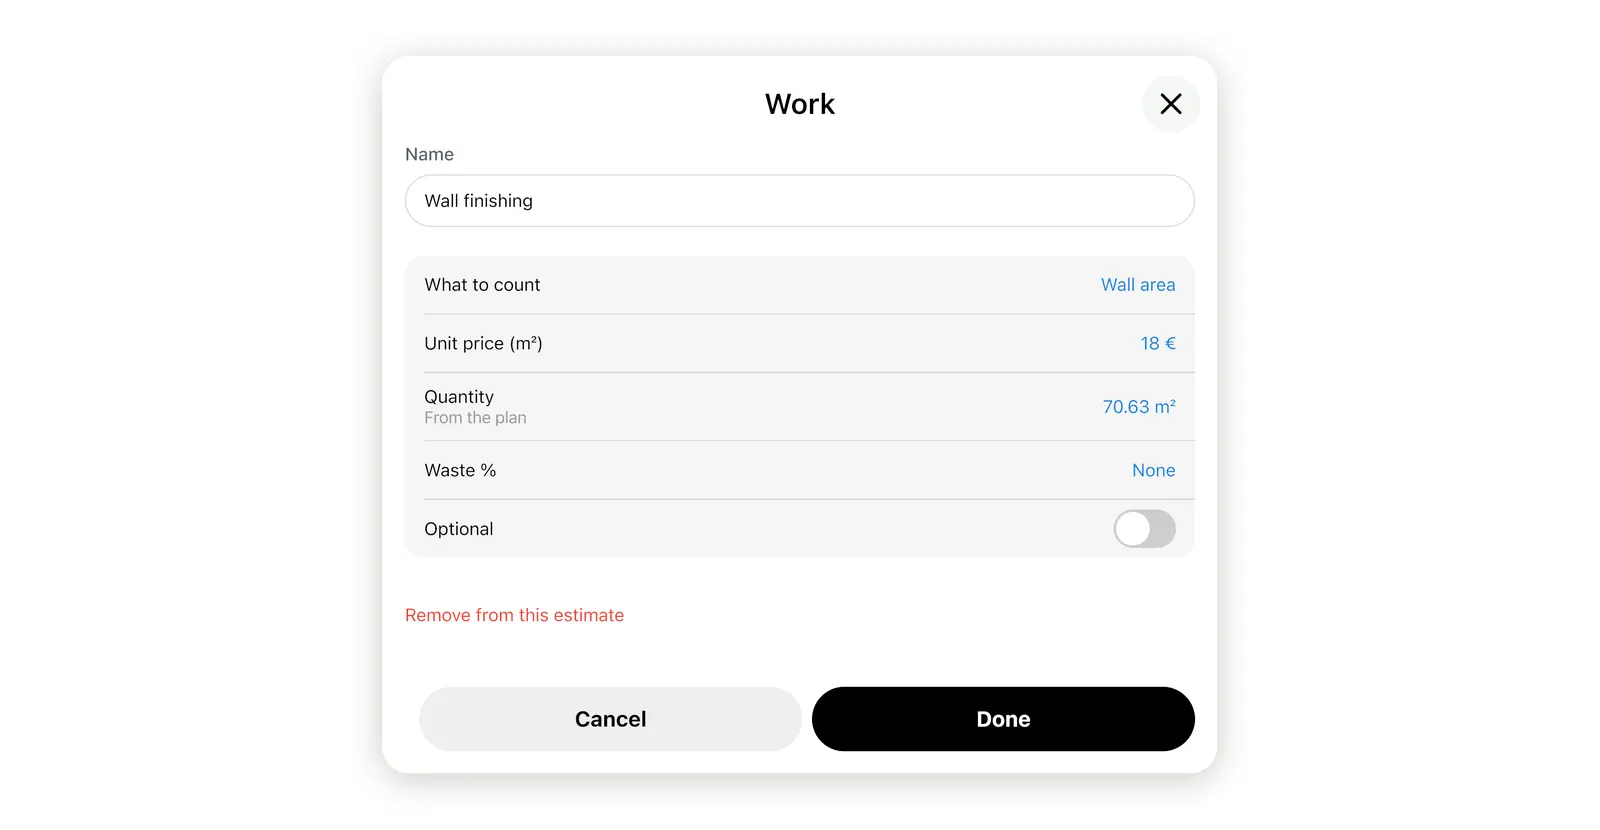
- Work. The Work section under Items has 8 ready-made lines, from Flooring installation to Reveal finishing. Enter the Unit price, and the quantity comes From the plan. For any other job, select + Add line at the end of the Work list.
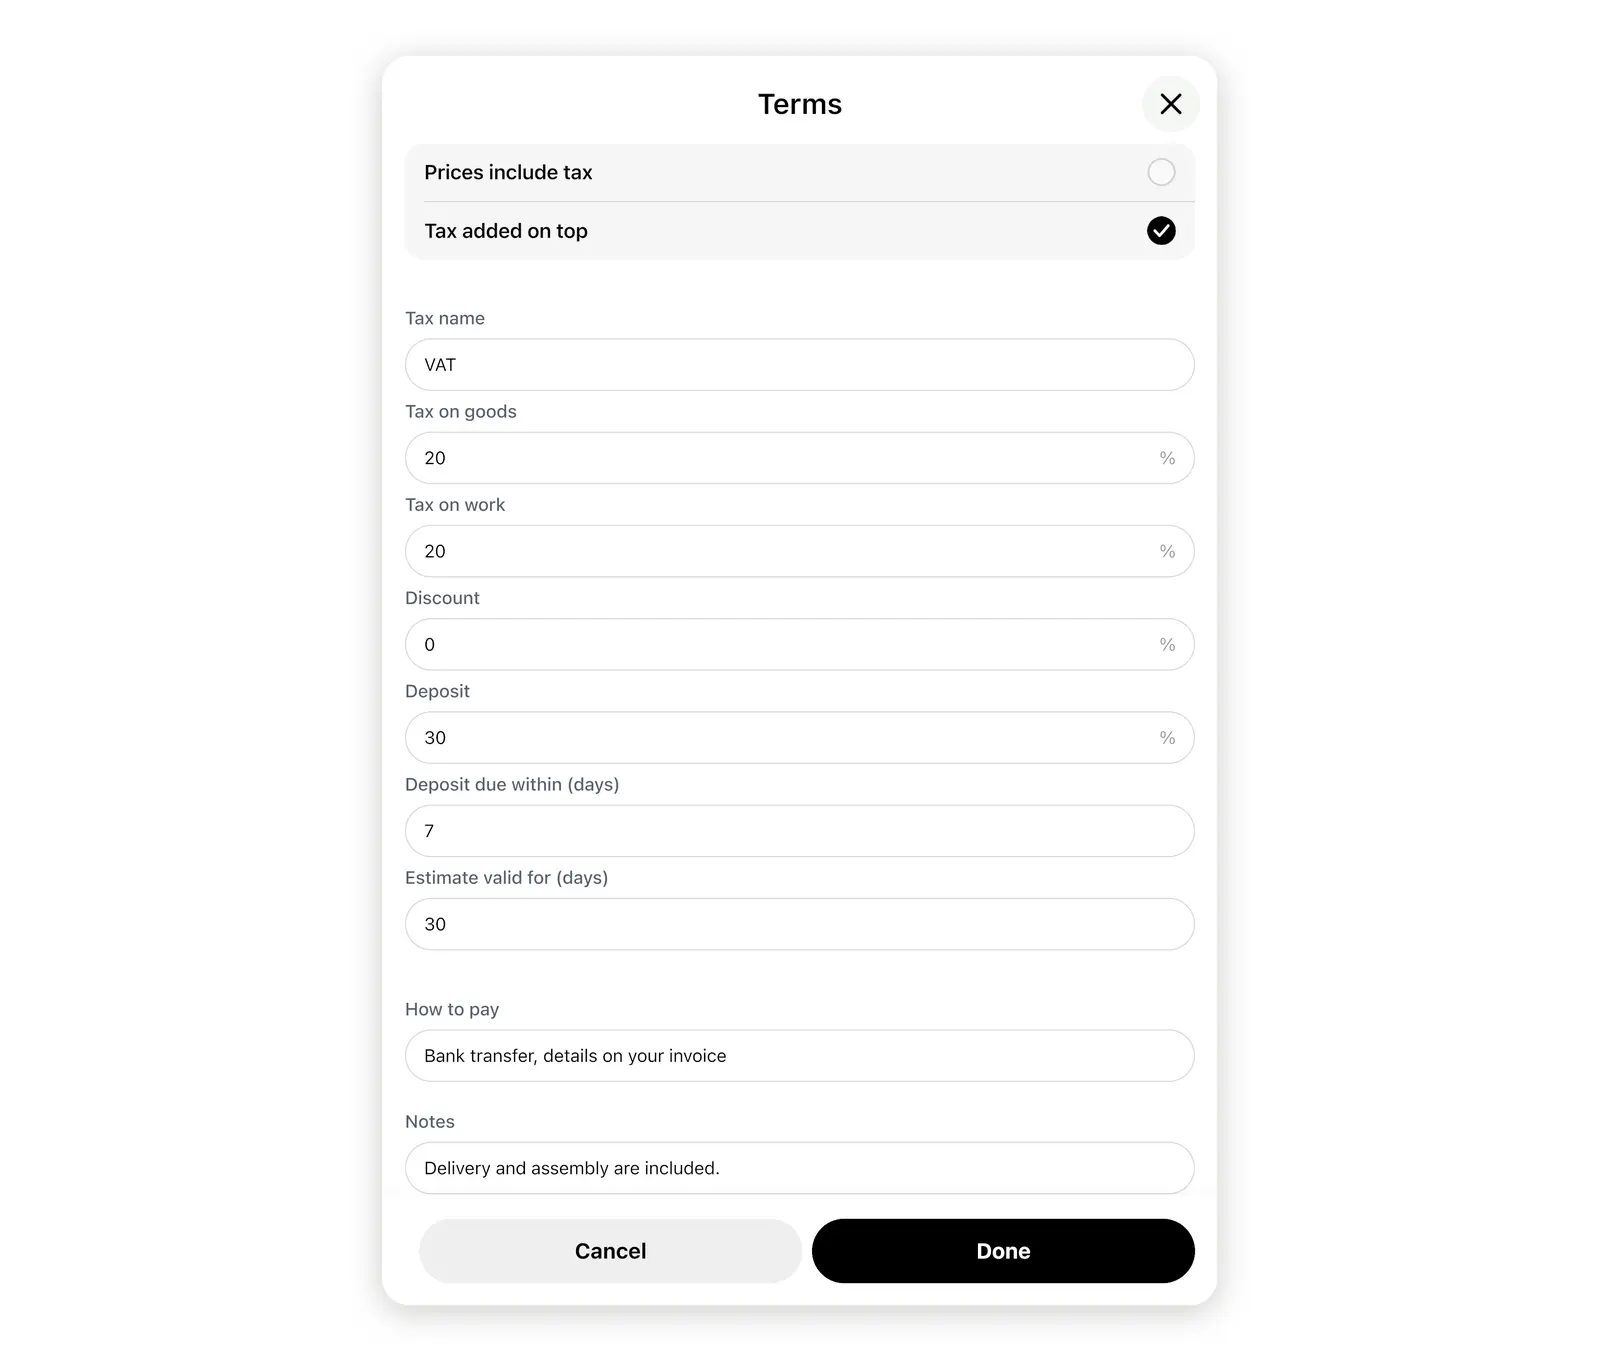
- Terms. Select the Terms row under Your prices to set the tax, Discount, Deposit, Estimate valid for (days), How to pay and Notes, then select Done.
- Unit prices. Turn on hide unit prices when you sell a room as one package. The client then sees the quantity and the line or room total, without the price per piece.
Enter a price once, and your next estimate fills it in. The bottom of the window shows Total for the client and Your markup, which only you see.
How do you send an interior design estimate PDF?
Select Estimate PDF. Home Planner numbers the estimate, adds your contacts and logo, and lets you send the file or a link.
- Select Estimate PDF at the bottom of the estimate window. The button turns active once at least one item or work line has a price.
- Sign in if Home Planner asks. The first time, the Contacts in the PDF sheet opens: fill in your company or studio and your phone.
- In the window that opens, choose how your client gets the estimate:
- send the PDF by e-mail or in a messenger;
- send the client link and add the client's e-mail. You see each reminder that went out, and you can turn reminders off;
- or, when the client sits next to you, select Sign with client and hand them the device. They draw a signature or type their name, then select Confirm signature.
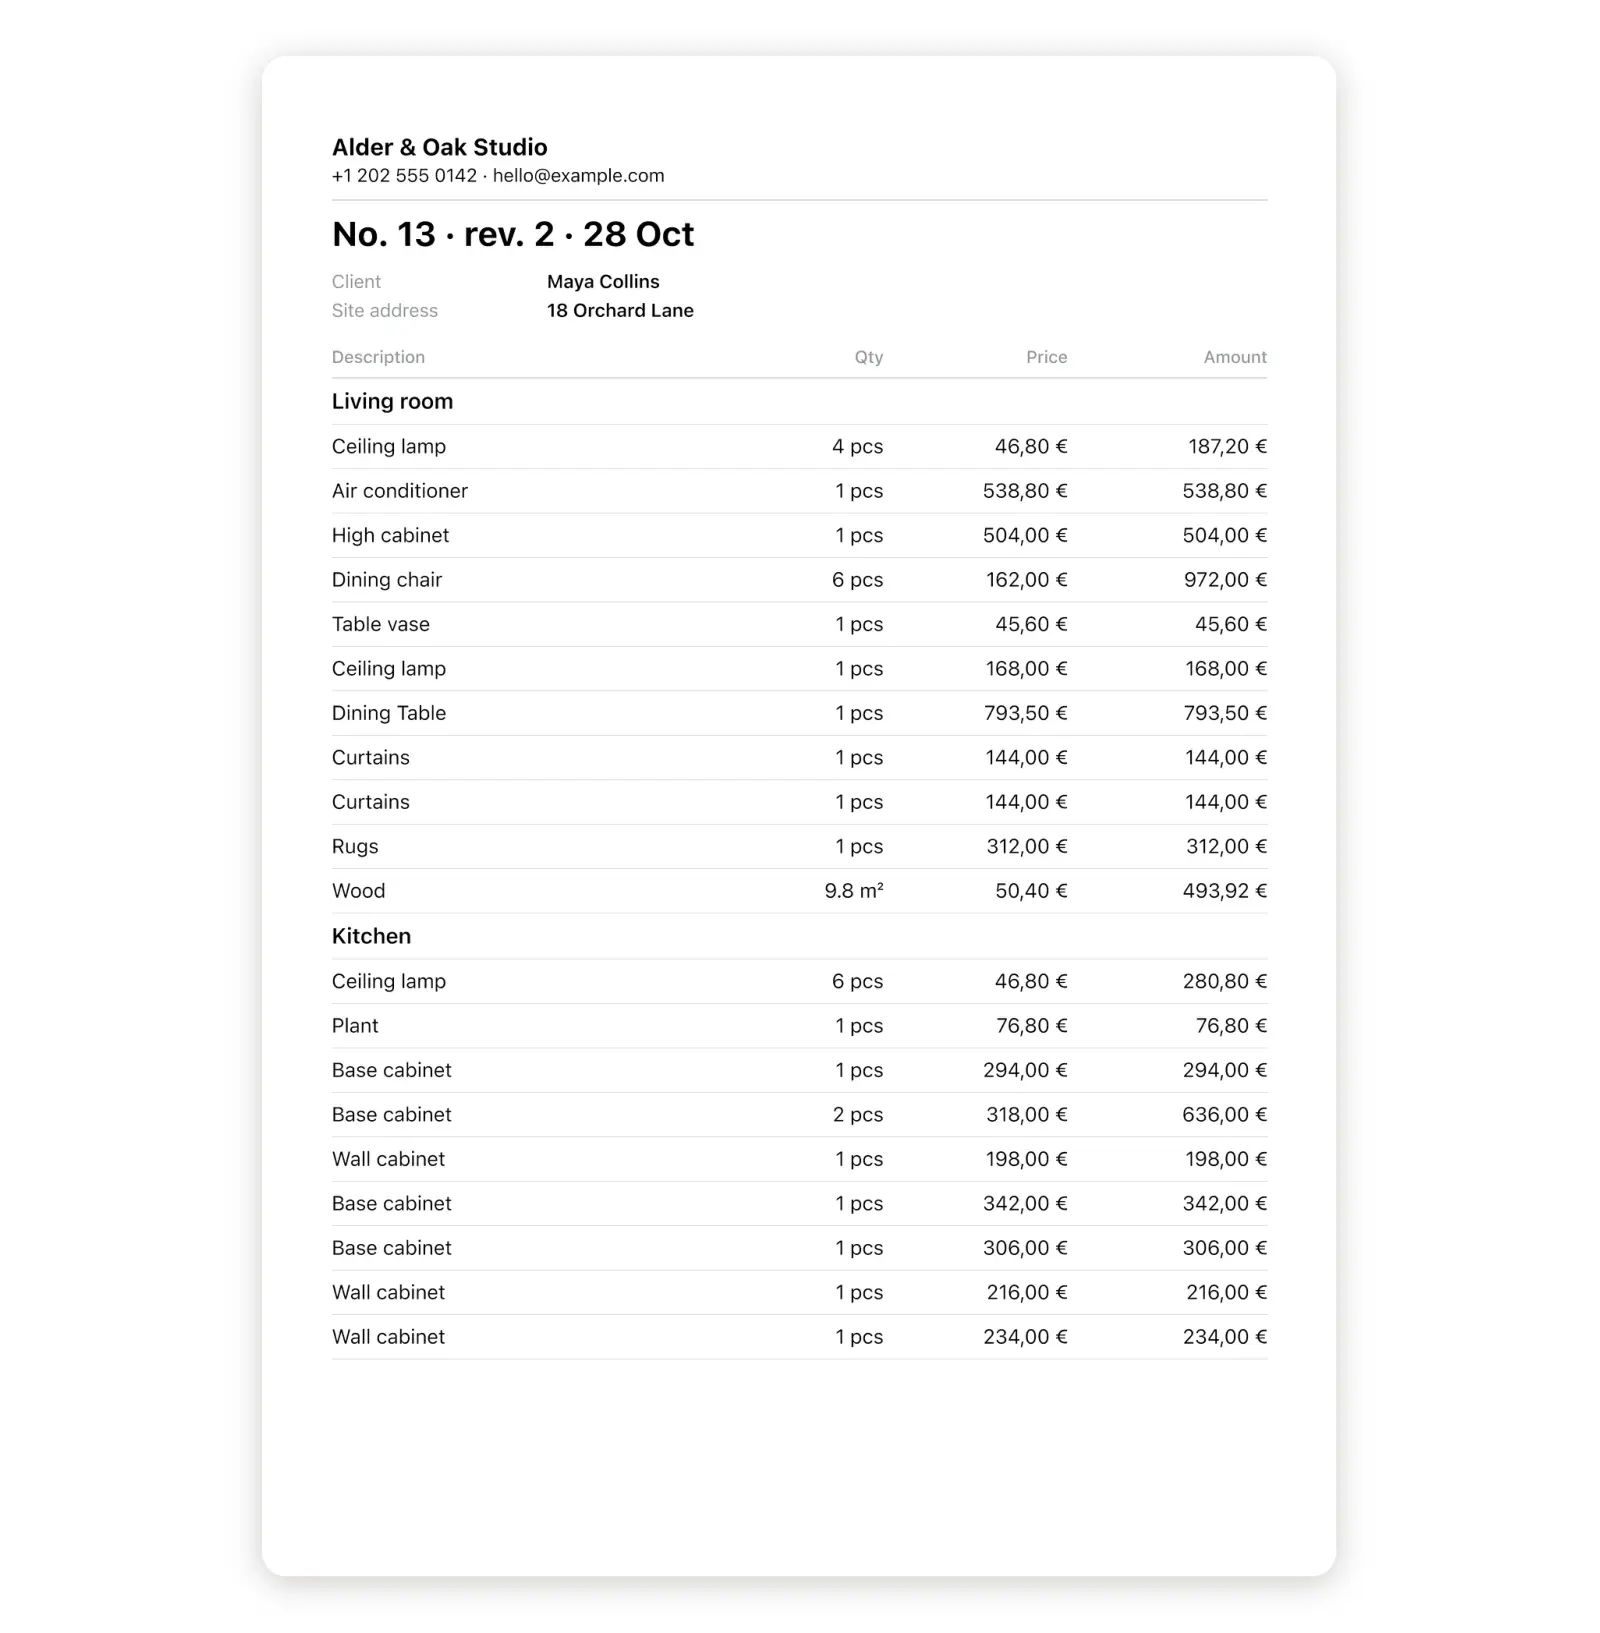
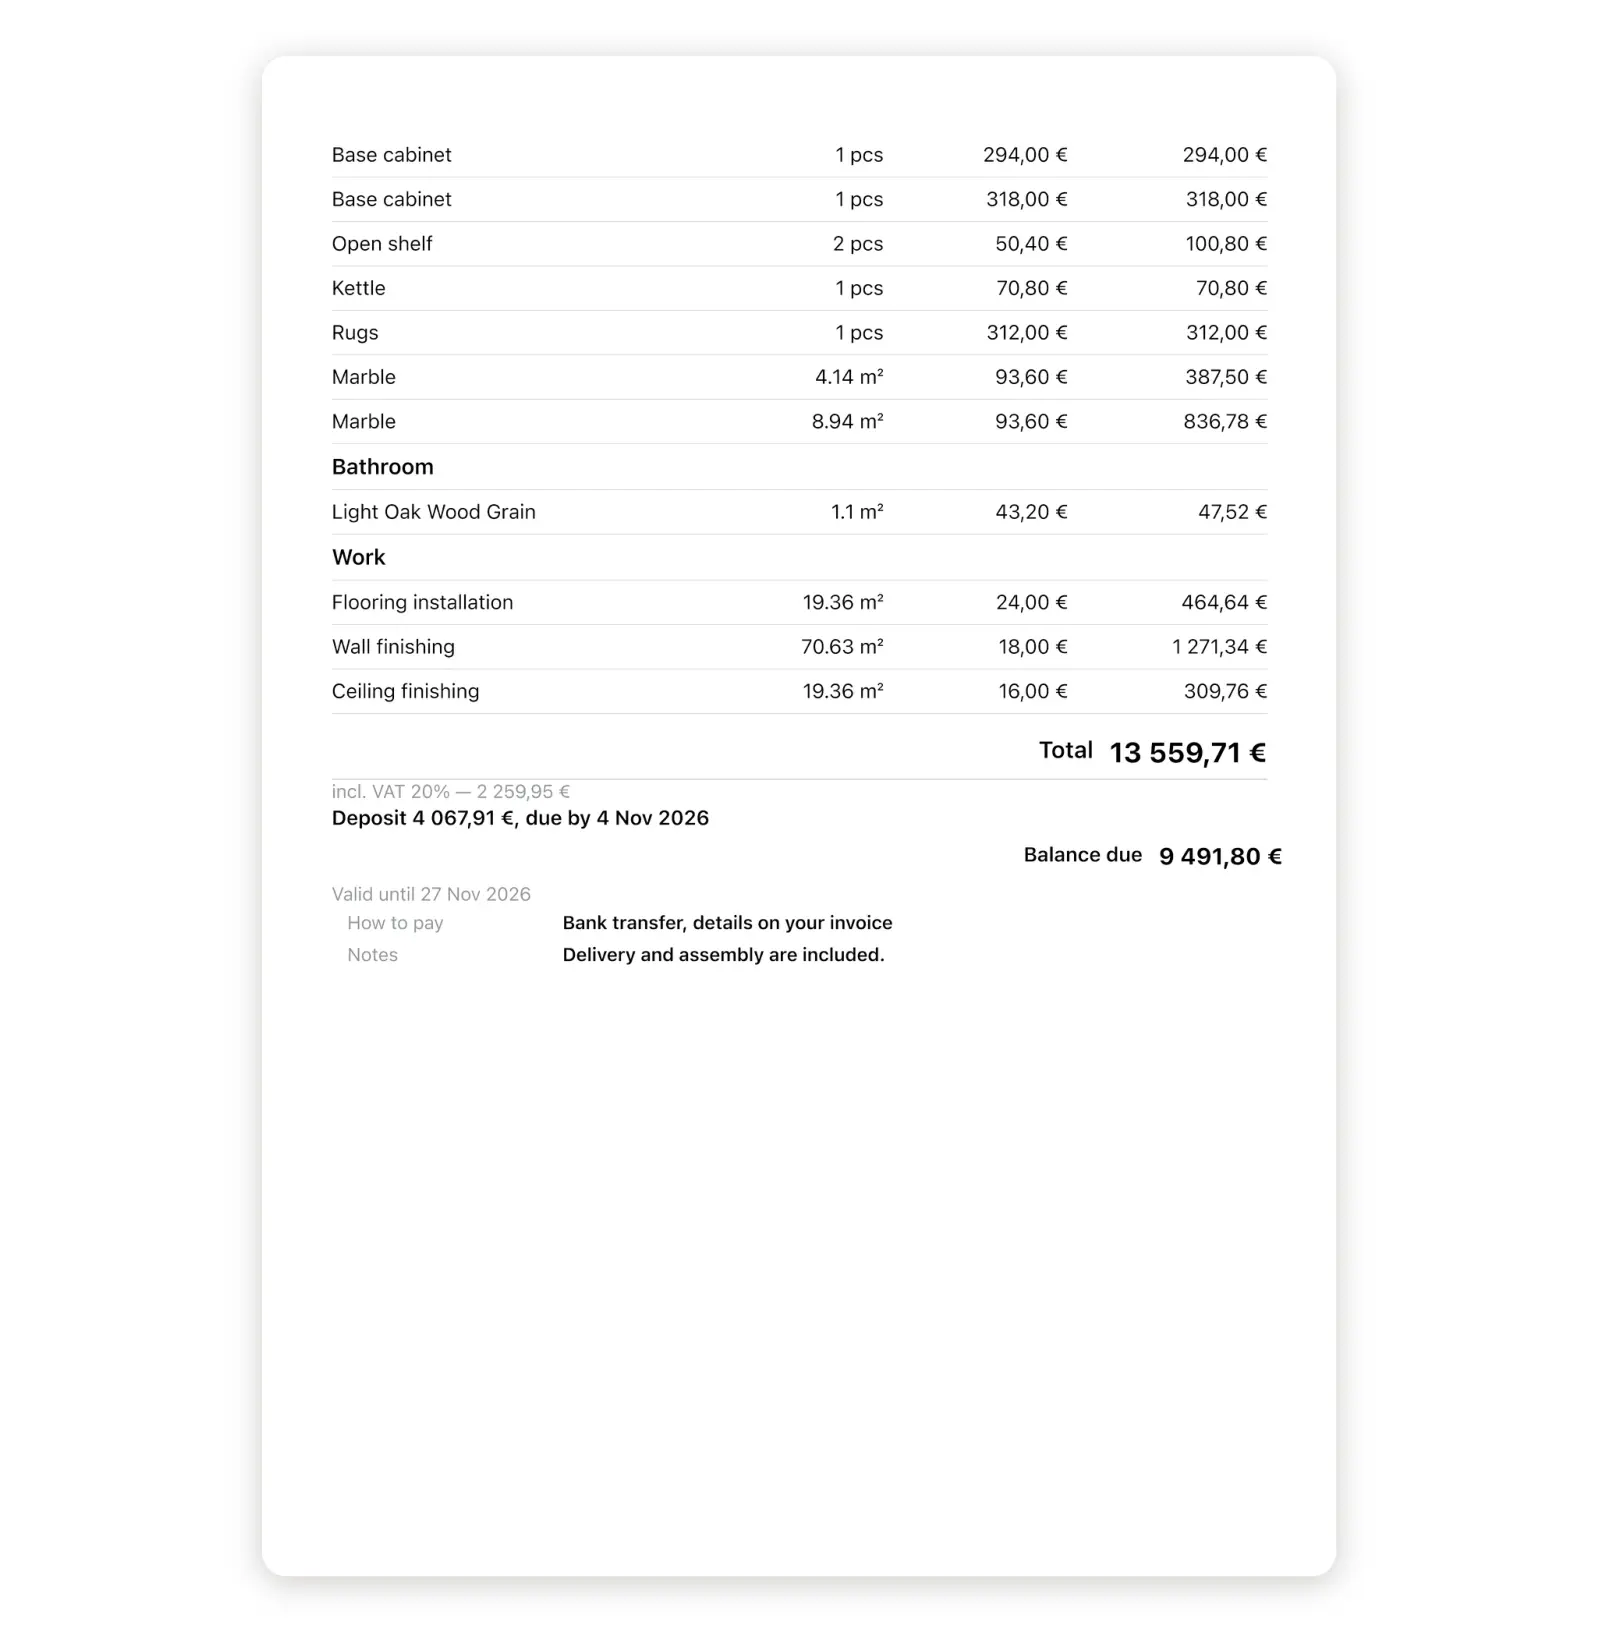
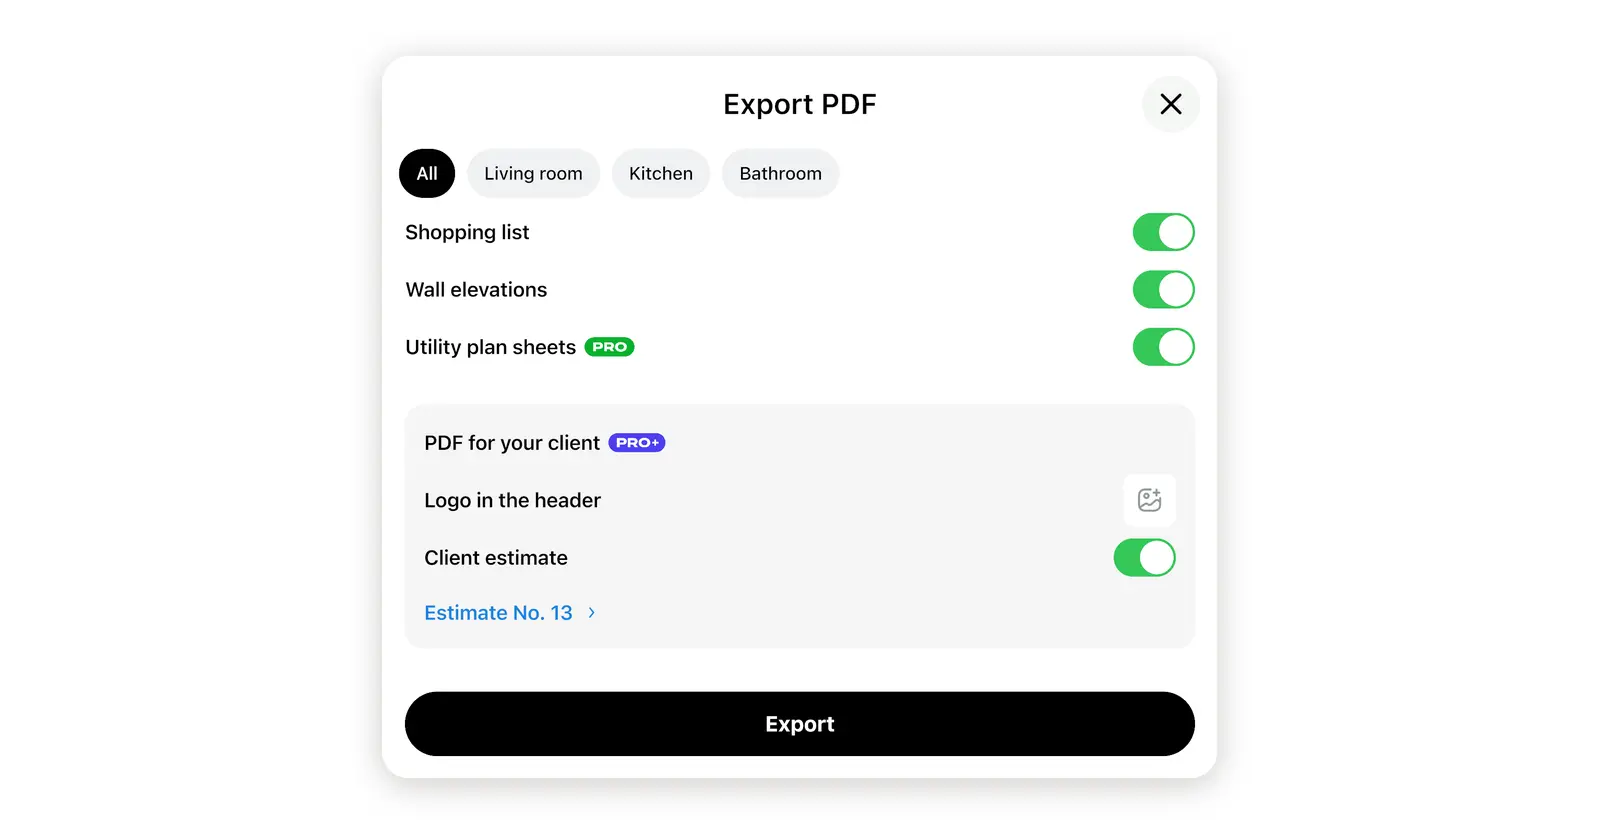
The estimate PDF holds the estimate only. To give the client the plans and the measurements as well, export the project report: select the share icon at the top right of the editor and choose PDF. In the PDF for your client block, turn on Client estimate, then select Export. The report's shopping list then shows Prices are in the estimate of and the estimate date in place of store prices, so the client sees one set of numbers. The Export PDF button next to Client estimate in the shopping list still prints store prices: keep that file for yourself.
What does your client see and do?
The client sees your company, the rooms with final prices, the total and your terms, and answers on the same page. You see each answer as the status of the estimate:
| Status | What the client did |
|---|---|
| Waiting for reply | Has the link and has not answered yet. |
| Approved | Accepted the estimate. With a signature, it shows as Signed. |
| Changes requested | Sent you a message with what to change. |
| Declined | Turned the estimate down. |
Home Planner also shows the approved amount in the estimate's row, so you know what the client agreed to without opening the PDF.
What happens when your client asks for changes?
You edit the same estimate and issue it again. Your client opens the link they already have and sees the new revision.
- Select Client estimate in the Shopping list window and change the prices, the lines or the terms.
- Select Estimate PDF at the bottom of the window again. The number stays, and the title shows rev. 2.
- Your client opens the same link. Home Planner shows a banner at the top of the page with the old and the new total, for example $18,220 → $18,540, and the changed lines are marked.
A signed estimate stays as it was signed. Changes after the signature need a new signature.
Where do you find the estimates you issued?
In two places: next to the project in the app, and in your Home Planner account on the web.
- In the app. Saved estimates in the Client estimate window lists each issued PDF with its number, date and status. Open the menu at the right of a row (the three dots) to Share PDF, export a Spreadsheet (CSV) or Delete it.
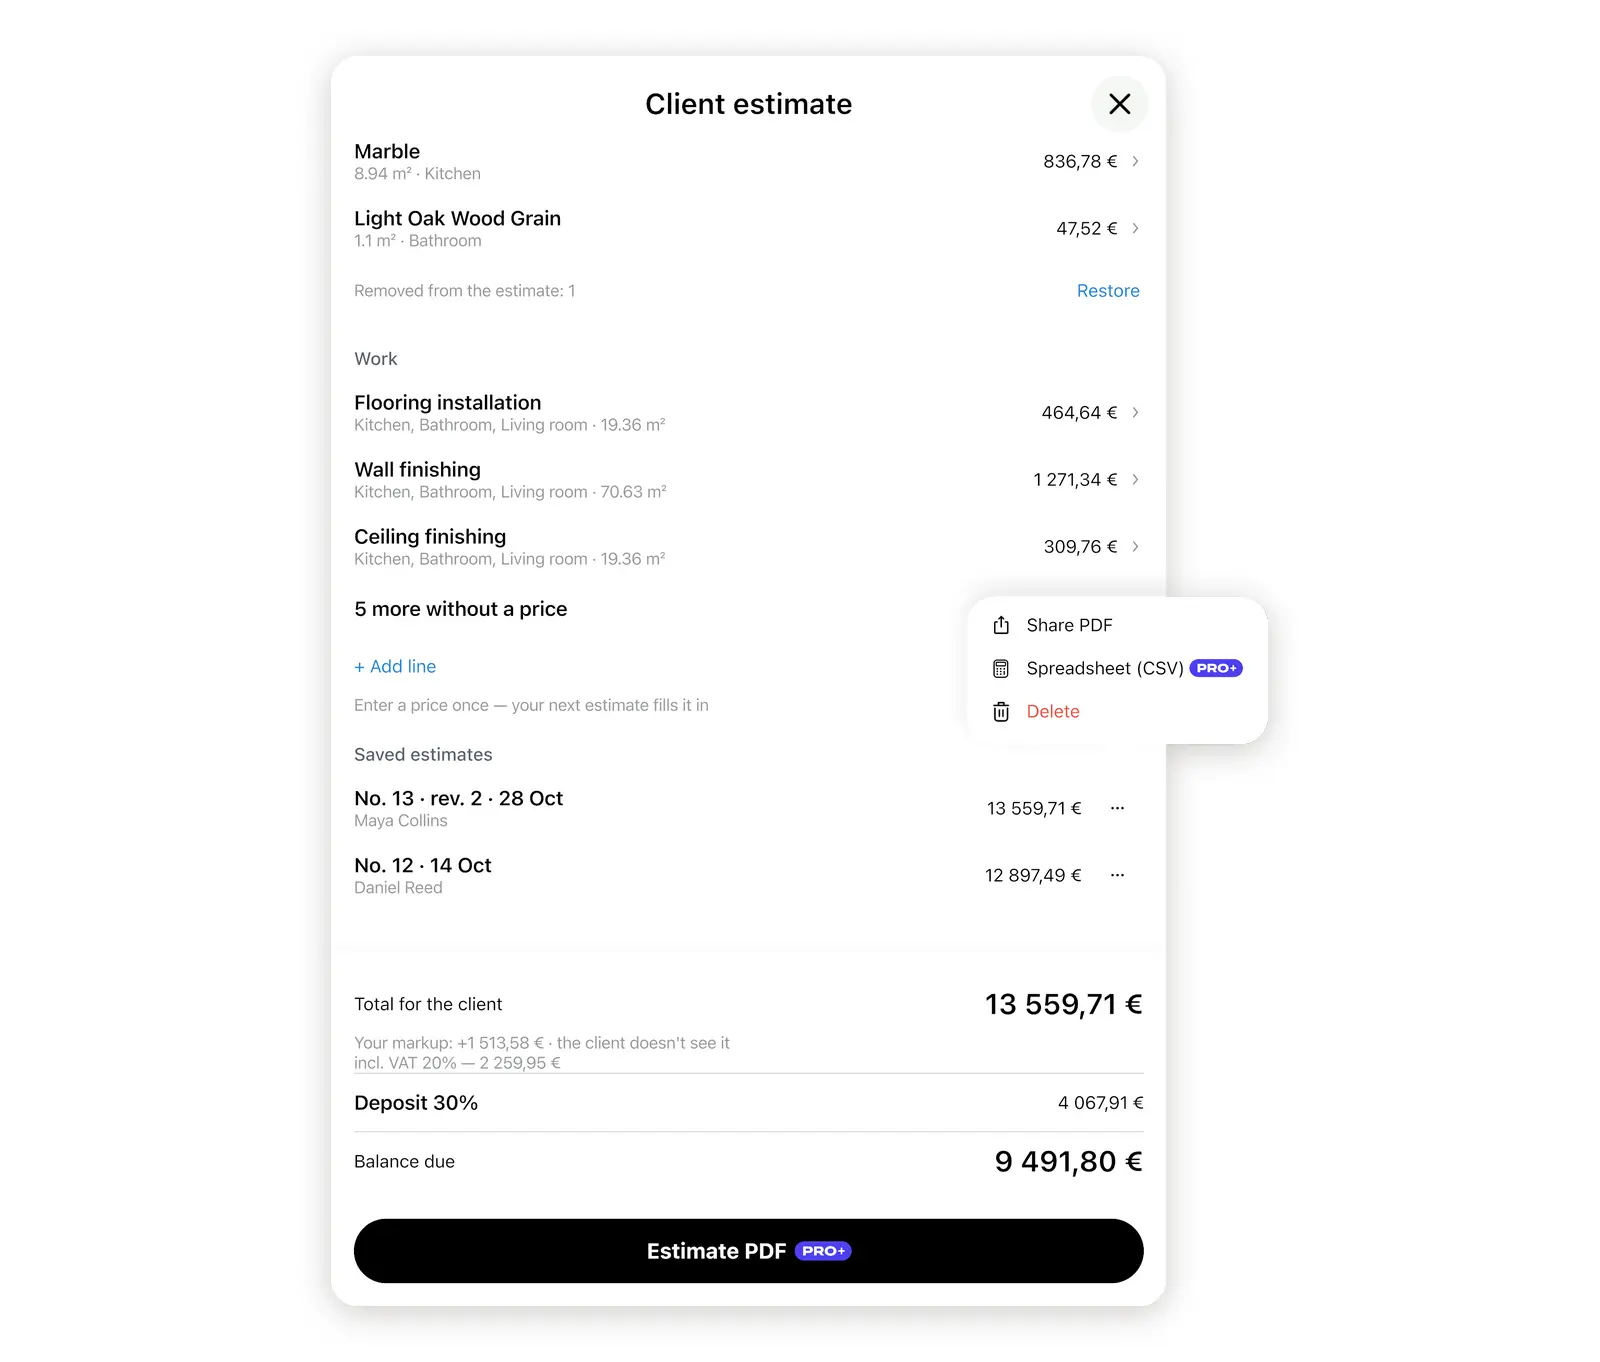
- On the web. Sign in at homeplannerapp.com, open your account and choose Estimates to download any PDF without the app.
Each PDF keeps its own prices, so later edits in the project do not change it. Do you run a studio? As the studio owner, you see the estimates and the client answers of all your staff in one place.
Which plan do you need?
Building an estimate is free on any plan. Your first estimate is free too, the PDF and the client signature included, and so are edits before signing. After that, issuing an estimate needs PRO+ or PRO++.
| Free | PRO+ or PRO++ |
|---|---|
| The estimate window and every calculation | Every next estimate PDF and client link |
| The sample PDF | A new signature after changes to a signed estimate |
| Your first estimate: PDF, link and signature | The spreadsheet (CSV) of an estimate |
A client is waiting for a price? Open your project in Home Planner and send the estimate from the design you already have.
Trademark notice. Home Planner is not affiliated with, endorsed or sponsored by Apple Inc., Google LLC or Microsoft Corporation; their names and marks belong to their owners. iPhone, iPad and Mac are trademarks of Apple Inc., registered in the U.S. and other countries. Android is a trademark of Google LLC. Windows is a trademark of the Microsoft group of companies. Other trademarks are the property of their respective owners.
Try it on your own project
Free room planner and interior design app