How to Keep a Home Renovation Diary, Before and After

Keep a free renovation diary in Home Planner: post before and after photos by stage, add notes and share your renovation journal.

A renovation takes months, and by the end nobody remembers how the kitchen looked before. A renovation diary keeps every stage in one place: photos, short notes and the date of each step, from the first "before" photo to the finished room. Home Planner includes a free renovation diary. For ideas on what to post, see Renovation Diary: transform your home and share your journey.
You need a free Home Planner account to publish. No subscription, no watermark. Diary posts are public in Home Planner: other users can follow your diary, like and comment.
How it works
In Home Planner, a renovation diary is a timeline of posts, sorted by renovation stage.
- Create a post: choose the renovation stage, add photos and a few words.
- Publish: your first post creates the diary. Each next post adds a dated step.
- Share: send the diary link to people who use Home Planner, or let them find it under Renovations.
Before you start
You need a Home Planner account, an internet connection and at least one photo or five characters of text.
| You need | Why |
|---|---|
| A Home Planner account | Home Planner asks you to sign in when you select Start. |
| An internet connection | Photos and posts upload when you select Publish. |
| A finished post | Home Planner does not save drafts. If you go back, Home Planner asks you to confirm; Discard changes deletes the photos and text. |
Start a renovation diary
Start your Home Planner renovation diary from the Create menu: the first post you publish creates the diary.
- Open Create: on a phone, in the bottom bar; on a tablet, Mac or Windows, in the side menu on the left.
- On the Renovation Diary card ("Track your renovation step by step"), select Start. If you are not signed in, a sign-in window opens first; then Create Post opens.
- At the top of Create Post, select Choose stage and pick a stage, then a sub-stage. The stage is optional: a post without a stage goes to Planning & Design, then Concept.
- Under Photos, select Add and choose up to 10 photos (phone: Camera, Photo Gallery or Files; Mac or Windows: a file picker).
- In Adjust photo, which opens for each photo in turn, drag the frame to crop and select Continue, or select Skip. If you close this window, this photo and the next ones are not added.
- Under What are you working on?, write what you did: from 5 to 2,000 characters, or leave it empty if the post has a photo. After you add a photo, you can select Try AI caption: it sends your first photo to an AI service and replaces the text in the field with a suggested text (the button then reads Regenerate). It can also set the stage, so check the stage afterwards.
- Select Publish. The diary opens with your new post.
To reorder the photos before you publish, press and hold a photo and drag it.
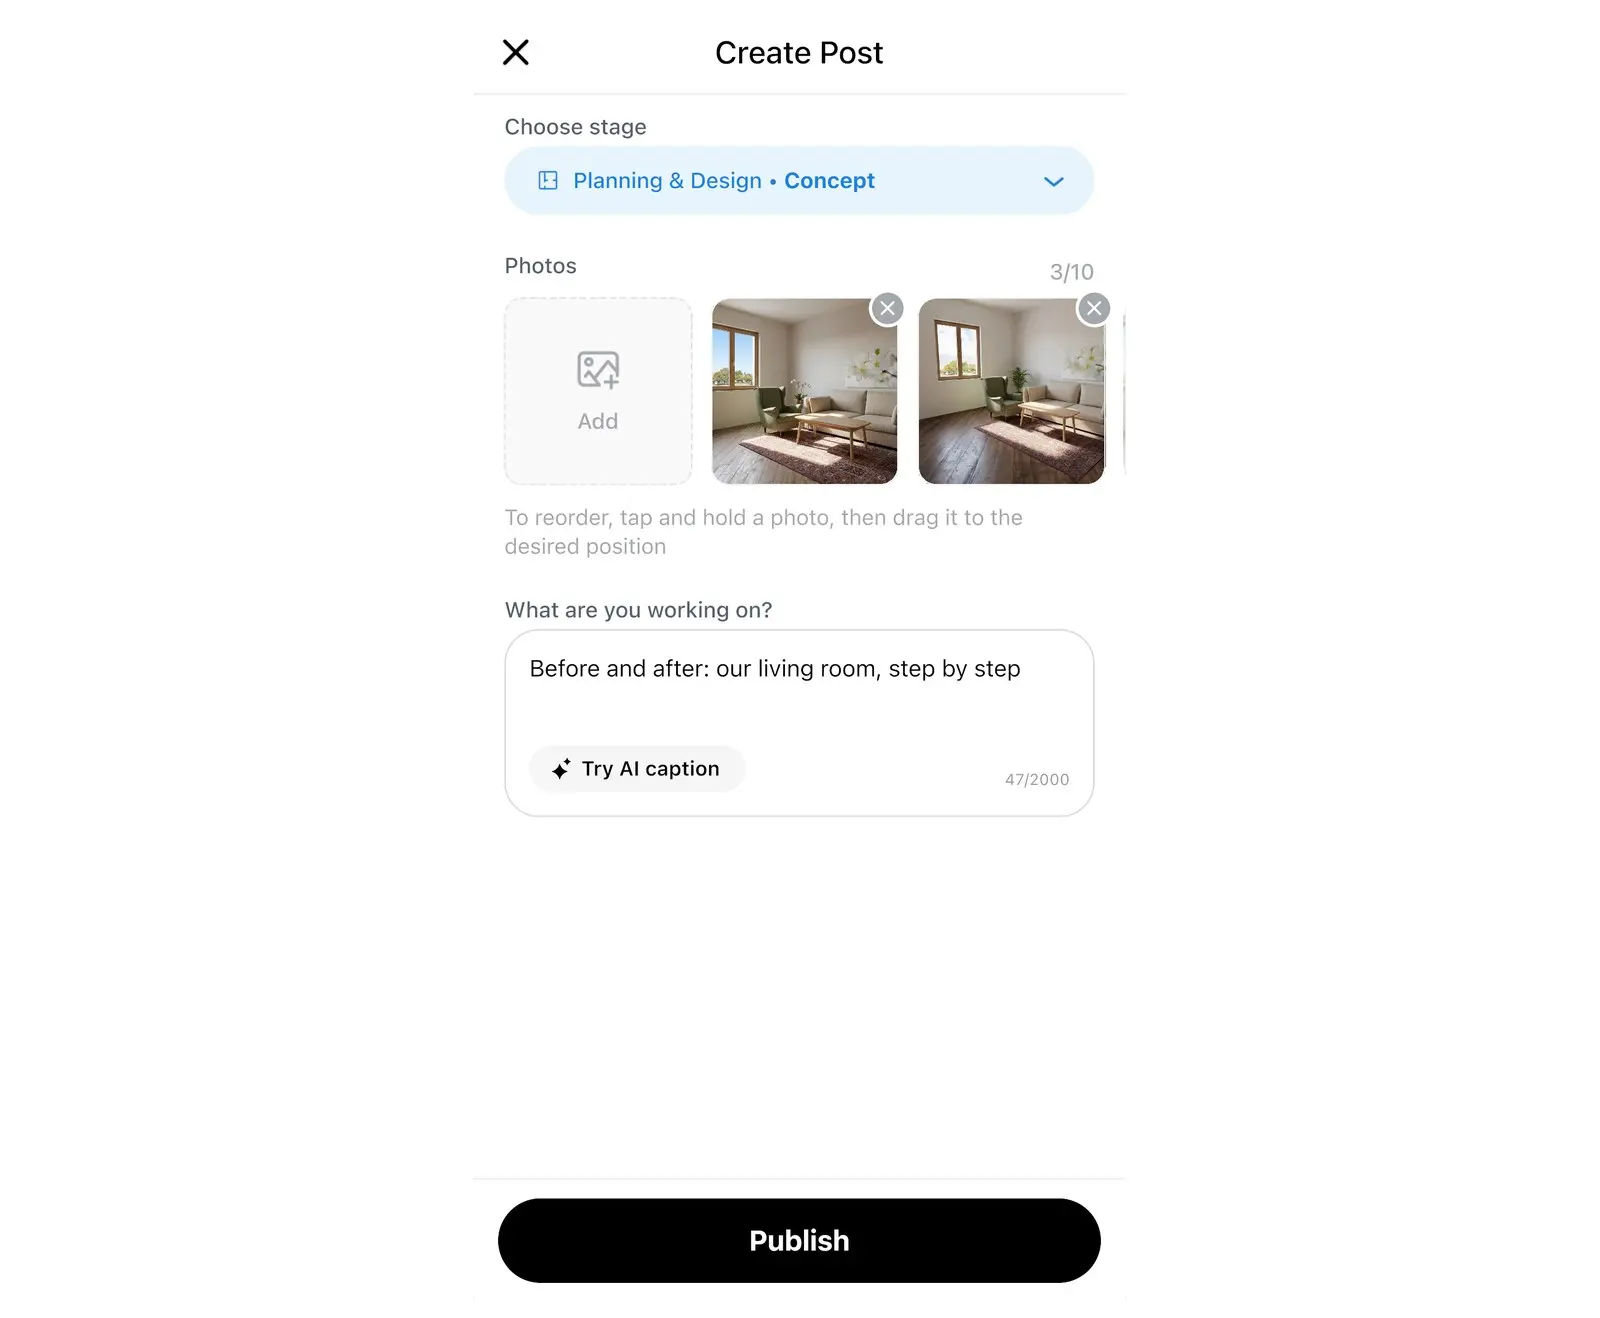
Your first diary gets the name New Renovation Diary. To rename it, see "Edit the diary details" below. You can also start a post from Explore: select + at the top right, then New Renovation Post in the Create window.
Add before and after renovation photos
Home Planner has no before-and-after comparison view: you post the "before" and the "after" photos as separate posts, and the diary lists posts in stage order, from Planning & Design to Move-In.
- Before work starts, publish a post with photos of each room as it is now. Choose Planning & Design, then Concept: the first stage of the diary.
- During the work, add a post at each milestone: open your profile → Renovations → your diary → Add a post, and choose the stage that fits: Shopping & Materials, Rough Work, Finishing Work, Furniture & Appliances, Decor & Lighting.
- When the room is done, publish the "after" post with Move-In, then Finished Interiors.
Take the "before" and "after" photos from the same spot and at the same angle: then the change is easy to see.
You can also select Start on the Renovation Diary card: it opens Create Post for your existing diary. To post to another diary, select the diary name on Create Post, or New Renovation Diary to start a new one.
Edit the diary details
The diary details tell other Home Planner users what your project is: name, housing type, size and style.
- Open your diary and select the three dots at the top right.
- Select Edit.
- Fill in Diary name and Type of housing. Choose a number under Bedrooms: on a diary made from your first post it is empty. Style has a preset value; change it if it does not fit. Area and City are optional and public: leave City empty if you do not want to show it. Select Choose cover to set the cover photo.
- Select Save changes.
To change or delete one post, select the three dots on it, then Edit or Delete. Deleting a post also removes its comments and likes.
Share your renovation journal
Every Home Planner renovation diary and every post has its own share link. The link opens in the Home Planner app, so the person you send it to needs the app; without it, a store page opens. On a phone, Share opens the share sheet. On Mac or Windows, Home Planner copies the link and shows a message with Ok and Open link.
Every diary post is public. It shows your profile name, picture and city, unless you turn on Hide my location in Edit profile. Do not post photos that show your address, documents, or people who have not agreed.
- Share the whole diary: open the diary, select the three dots at the top right, then Share.
- Share one post: select the three dots on the post, then Share.
- Find other diaries: open Explore → Renovations. Select Follow on a diary to see its new posts in your feed.
Trademark notice. Home Planner is not affiliated with, endorsed or sponsored by Apple Inc., Google LLC or Microsoft Corporation; their names and marks belong to their owners. Mac is a trademark of Apple Inc., registered in the U.S. and other countries. App Store is a service mark of Apple Inc., registered in the U.S. and other countries. Other trademarks are the property of their respective owners.
Try it on your own project
Free app for iPhone, iPad, Mac, Android and Windows.